
The Big 7: Simple mobility assessments to keep triathletes injury free
Alan Couzens, M.S. (Sports Science)
Sep 2nd, 2015
Note: Split not required :-)
There has been a huge increase in interest over recent years in the topic of mobility work for athletes. This is due in large part to the efforts of guys like Mr. MobilityWod – Kelly Starrett (mobilitywod.com) & other brilliant minds in the field like FMS founder, Gray Cook.
If we're to be honest, it’s really only recently that we’ve even begun to question the validity of the old belief that there are only 2 types of endurance athletes – the injured & those who are about to become injured! Some of us may still even have that core belief that injuries are 'part and parcel' of being a 'serious' endurance athlete floating around the old noggin'
But, providing the athlete is smart and diligent this doesn't have to be the case...
We're coming to realize that, in a healthy, structurally sound system, no, injuries aren’t a ‘normal part of the game’. They represent a failure at some point in the 'chain' – whether a structural repair failure (i.e. too much load, not enough recovery) or a biomechanical failure – structures being put at higher than optimal levels of stress due to length-tension imbalances & biomechanical dysfunction. We're also coming to realize as each age group gets more and more competitive that a large part of your success will come down to how much training you can string together while remaining injury free...
Consistency in training builds champions and there is no surer way to be inconsistent than to be injury-prone.
The great problem that we have as (human) athletes is that we are so adaptable(!), i.e. our bodies are so darn good at figuring out a way to ‘get the job done’ even if inefficient and potentially injurious! We can keep things rolling along with really crappy, damaging, movement patterns for quite a long time without really being aware of just how bad things are! If we attempt a motion that exceeds our functional range of motion for a given muscle/joint, our body has a great back up plan - we’ll just bring in less efficient muscles (often stabilizers that aren’t designed for the task) to 'help out', i.e. we’re bringing in our Div 3 players to front up in a Div 1 game – a concept called synergistic dominance. Unsurprisingly, if continued over a period of time, these 'b level' players get tired and hurt!
This strategy ‘works’ for a while but, as athletes become more and more interested in performing sport at a high level over their whole lives, consideration of this interplay between mobility and technique becomes more important. Enter the experts mentioned above…
Kelly has written some great practical manuals on the topic that I'd highly recommend. Starting point: "Ready to Run" & for more in depth reading "Becoming a Supple Leopard". Gray also has written some great books. I'd highly recommend "Movement". In 'Movement' Gray outlines the 'functional movement screen' - a 7 test battery that gives the practitioner/coach a HUGE amount of context on the way that an athlete moves – more specifically, the functional & dysfunctional patterns that an athlete falls into to ‘get the job done’. For a great overview of the FMS, see here
While I’m a huge fan of the FMS for the amount of specific info it provides, its strengths are also its weaknesses. The FMS utilizes integrated movements to assess mobility. Integrated – meaning more than one joint is active at a time and movements, meaning, well, the athlete isn’t standing still :-) On the positive side, these 2 elements make the assessment more functional (i.e. related to the way you move in every day activities) and more sport specific (most sports involve movement :-) but…
As a coach watching an athlete perform, say, an overhead squat – there is a lot of info hitting my brain at the one time waiting to be filtered. Now, I should probably say, my brain’s processing speed probably isn’t what it was when I was a 20 something personal trainer seeing Gray’s assessment for the first time but these days, for whatever reason, I can feel a bit overloaded in the info that is available to me in a short FMS.
This isn’t to discount the value of the FMS, more to place it on a continuum of differing levels of ease of use/specificity. All of which have merit in a comprehensive assessment.

In an athletic sense, all points on the continuum are useful & frame one another, i.e. if we at least know the athletes pure range of motion limitations at the various joints, when we move to more integrated, functional assessment of the way that an athlete moves, we can bring in that context, e.g. if an athlete has really poor static calf flexibility and they are unable to get into a good squat, we know that may be a limiter. If, on the other hand, the athlete gets a thumbs up on all of the ROM components of a squat but they still suck at it, maybe they just don’t really know how to squat(!) or they lack the neuromuscular control to put it together. Either way, the preliminary knowledge will help us move to the (correct) next step.
Taking the same principle even further along our scale - is the athlete turning his feet out when running to protect his tight calves/Achilles? Is there a tightness further up the chain that might explain it? Or is that just the movement pattern he has fallen into? Answering this question will help us determine the relative merit of trying to improve the efficiency of his movement with technique/drill work. If the athlete simply can't get into a good position, due to poor joint mobility, drills aren't going to help! This is a common oversight of adult-onset swimmers - something I'll talk about more in a future post on upper body mobility.
So, gaining this additional context sounds great in theory but the other big downside (apart from a loss in specificity/functionality) in a move from integrated to a more isolated assessment is that we have a lot of joints in the body that move in a lot of different planes! So, getting down to brass tacks, we need to narrow things down a bit and answer the question - based on the most common injury patterns/'hot spots' for triathletes: What are the key static ROM assessments for triathletes & what are 'good' ranges of motion at each respective joint?
Let’s start with the lower body…
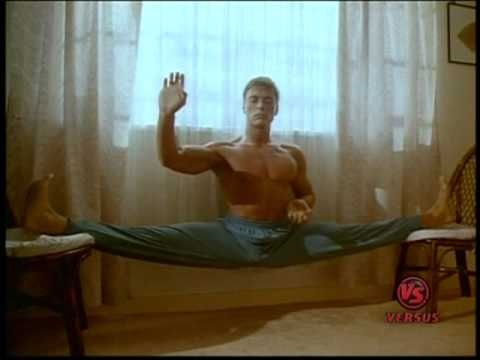
1 Ankle assessment (plantar/dorsi flexion)
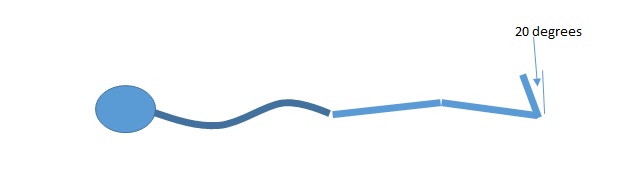
Lay supine on a firm surface with legs extended fully and bring the toes as close to your shin as possible. If done with heels flush against a wall we can get a great frame of reference for dorsi flexion.
For plantar flexion, keep same position but point toes – assess both through the line of the 5th metatarsal head rather than the any bend of the toes.
Insufficient dorsi flexion is a common precursor to injury in runners. Often this manifests in the Achilles, which is put under significantly greater tensile force than in an athlete with a ‘supple’ calf muscle. This becomes all the more true in fitter athletes who are running at faster paces and therefore putting this calf-achilles complex under greater load.
On the other end, insufficient plantar flexion is a common problem in triathletes who tend to swim a lot less than they bike/run (&/or skip their kick sets in the pool!). When swimming, this leads to an inability to keep a nice clean line and, even for wetsuit swims, where athletes aren’t kicking a lot can have seriously negative impact on body position – bringing the whole leg down and increasing drag.
2. Straight leg hip extensor assessment
Same supine position, with fully extended leg raise foot as high as possible WITHOUT LOSING THE CURVE IN YOUR BACK – place your hand under the curve in your back so you can feel when this starts to occur.
This is a particularly important range for a good aero position. Triathletes with limits here will be forced to accomodate the aero position with more flexing at the lumbar spine, increasing disc stress/low back stress and leading to a less powerful, less aero bike position.
3. Bent leg hip extensor assessment

Same test only with bent knee. Same rules apply – only go as far as you can without losing the arch in your back. If you feel an increase in pressure on the hand, stop at that point.
Inadequate range here affects the top of the pedal stroke and often results in hip rocking as the athlete attempts to get the leg over the top of the stroke by hiking the pelvis rather than flexing the femur. This also leads to low back stress and compromised power output as the glutes are taken beyond their ‘power range’.
4. Hip flexor assessment (Thomas test)
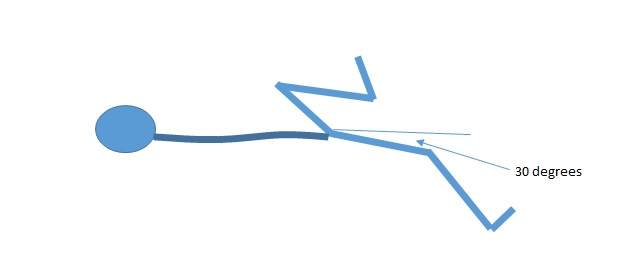
Sit right on the edge of a (sturdy) table. Bring one knee to your chest and hold it tight then fall back and let the other leg continue to hang off the table. Note the angle between horizontal and the final resting position of the femur.
A common prob for combo office worker/triathletes, i.e. athletes who sit a lot. A good efficient run stride requires hip extension beyond the line of the body. When unable to do it with the hip, athletes will run inefficiently & tend to accommodate the movement with more movement of the lumbar spine – extension &/or rotation. Both very negative things for the long term health of your spine.
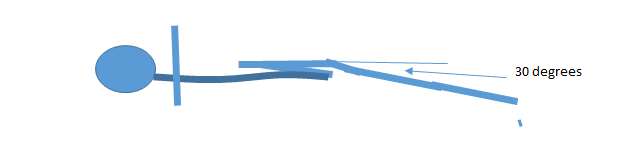
5. Horizontal adductors
This is where my artistic skills started to fail me :-) OK – so what the picture is supposed to be showing. Lay flat with your back flat and feet against the wall. Let the knees fall to the side as far as they can, while keeping back flat.
Another common prob for folks who sit too much/don’t squat enough When adductors are tight, abductors tend to switch off – a concept called reciprocal inhibition. These are key muscles in maintaining a level pelvis and good hip-knee-ankle alignment during the stance phase in running. Athletes with tight adductors will often pronate excessively and experience knee issues due to the faulty alignment of the femur/tibia during stance.
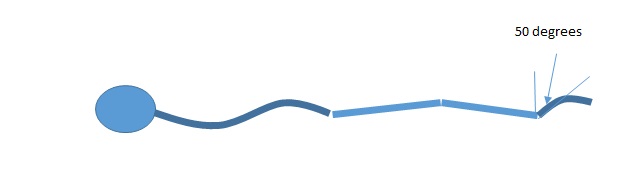
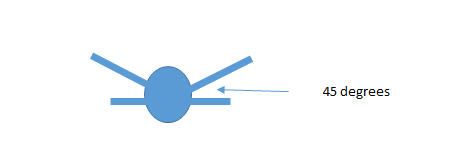
6. Internal/External rotators
Didn’t even bother with an artistic attempt on this one! Will do my best to describe. Lay prone with both hips firmly pressed into the ground. Keep both hips in contact with the ground throughout. Flex one knee to 90 degrees then let it fall alternately to both the inside and outside like a windshield wiper. Go as far as you can without the pelvis lifting.
When internal rotators are tight, it’s a double whammy – you get the ill effects of diminished hip extension as seen in tight hip flexors along with excessive knee stress (due to both valgum and torsion) that you see with tight adductors. No Bueno.
Tight external rotators often go along with tight hip extensors. These are the guys you see riding with their knees 3 feet out from the top tube. Inefficient and obviously not optimal for knee alignment or aerodynamics. Similarly, their inability to ‘roll the femur through’ in run gait leads to excessive lumbo-pelvic motion – they run with their spine :-/
7. Hip Abductors (Ober’s test)
Again, Rembrandt can continue to breathe easy for a bit :-) Pic is showing – side lying position on table bottom hip & knee are both flexed to ensure stable pelvis. Top leg hangs back off the table behind the line of the body. Ideally you should get some drop in the femur without moving the pelvis. You can google “Ober’s test” for better illustration.
Tight hip abductors, particularly TFL, leads to a host of problems – ranging from inability to push the hip through extension during gait to internal rotation and excessive lateral motion of the knee during pedal stroke (ever have one of those Retul knee tracks that looks like you were running through the alphabet in cursive?), to the dreaded ITB syndrome. This is one area you don’t want to be excessively tight.
*****
I’ve been taking athletes through various iterations of this assessment for many years, in gyms, physical therapy clinics and one-on-one coaching practice. As I moved to doing more and more online coaching, I found that I was really missing this context. However, in this day and age, distance is not a limiter. If you are a remote coached or self coached athlete, it is super easy to run through the above series in front of a (centered) video camera and then import the video file to a program like Kinovea (www.kinovea.org) for analysis.
This series of assessments flows really nicely as a flexibility session & can be easily done in 10-15min. The coach or athlete can then pause the video at end range of motion for each assessment and plot angles using Kinovea’s tools to get a good starting assessment of the remote athlete’s static flexibility.
Again, this is just a starting point. Static flexibility and functional mobility aren’t synonyms. Having sufficient static range of motion at key joints is a necessary but not sufficient condition for functional, sport specific, mobility. But starting at the 'shallow end' of the spectrum can, at least, provide the athlete with both a more focused approach to their flexibility routine and some useful context to begin exploring more functional and sports specific biomechanical limiters. I’ll take a look at the upper body & address some of these more ‘functional’ tests in future posts. Until then…
Train smart,
AC.
TweetDon't miss a post! Sign up for my mailing list to get notified of all new content....